Here’s how to create a 301 redirect for WordPress pages.
If you’re a website owner or developer, you may encounter situations where you need to change the URL of a page on your WordPress site. However, changing the URL can lead to broken links and negatively impact your site’s SEO. This is where 301 redirects come in handy. A 301 redirect is a permanent redirection from one URL to another. It tells search engines that the page has permanently moved to a new URL and all traffic and link juice should be transferred to the new page.
In this article, we’ll discuss how to 301 redirect a page in WordPress using the 301 Redirects plugin. This plugin is free and can be downloaded from the WordPress plugin repository.
Step 1: Install and Activate the 301 Redirects Plugin
To get started, log in to your WordPress dashboard and navigate to Plugins > Add New. In the search bar, type in “301 Redirects” and hit enter. The plugin should appear as the first result. Click on the “Install Now” button and then activate the plugin.
You can also find the plugin for download right here.

You’re looking for this version of the plugin in your WordPress dashboard.
Step 2: Create a New Redirect
Once the plugin is activated, navigate to Settings > 301 Redirects. This will take you to the plugin’s settings page where you can create new redirects. To create a new redirect, simply enter the old URL in the “Request” field and the new URL in the “Destination” field.
For example, if you want to redirect http://example.com/old-page to http://example.com/new-page, enter “/old-page” in the “Request” field and “/new-page” in the “Destination” field. Make sure to include the forward slash before the page slug.
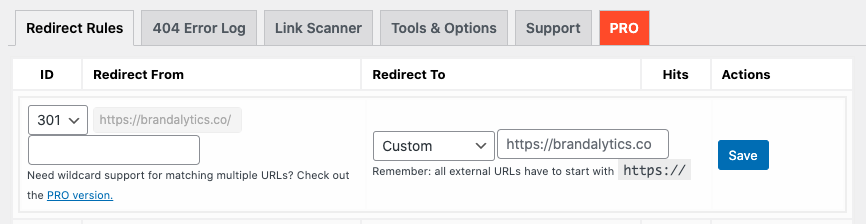
In your settings, you will see the option to create the redirect.
Step 3: Test the Redirect
Once you’ve created a redirect, it’s important to test it to make sure it’s working correctly. To test the redirect, simply enter the old URL in your browser and hit enter. If the redirect is working correctly, you should be redirected to the new URL.
If the redirect isn’t working, double-check the URLs you entered and make sure they are correct. You may also want to clear your browser cache and try again.
Step 4: Check for Broken Links
After you’ve set up your redirects, it’s important to check your site for broken links. Broken links occur when a page on your site links to the old URL instead of the new URL. Broken links can negatively impact your site’s SEO and user experience.
To check for broken links, you can use a free tool like Broken Link Checker. This plugin will scan your site for broken links and provide a report of all broken links found. Once you have the report, you can fix any broken links by updating the URLs to the new URL.
Step 5: Remove Redundant Redirects
Over time, your site may accumulate redundant redirects. These are redirects that are no longer necessary because the old URL no longer receives any traffic or link juice. Redundant redirects can slow down your site and waste server resources.
To remove redundant redirects, simply delete the redirect in the 301 Redirects settings page. You can also use the “Bulk Actions” feature to delete multiple redirects at once.
In conclusion, 301 redirects are an important tool for website owners and developers. They allow you to change the URL of a page without negatively impacting your site’s SEO or user experience. The 301 Redirects plugin makes it easy to create and manage redirects in WordPress. By following the steps outlined in this article, you can ensure that your site is properly redirected and free of broken links.
- Chat GPT for Flights: Revolutionizing Air Travel with AI - July 25, 2023
- Best Tattoo Artists in Fort Worth: Discover Fort Worth’s Finest - June 28, 2023
- Chat GPT for Mac: Unlocking New Conversations with AI - June 19, 2023

How To Access Microsoft Bing Chat Bot